Hey Everyone!!
Well, I just want to begin by saying, I am sorry it has been so long! I have to be honest, the past few months were a little difficult around here. My husband had gotten laid off THREE times since he got back to work in March. He was laid off the whole winter (He's in the Union) and was lucky enough to be called back to work in March. We were SOO happy! Then, shortly after he was laid off AGAIN! Then called back, then laid off another time. It was rough around here. Thank GOD for family and ALL th support they gave! After a lot of praying and a lot of phone calls, my husband received a phone call from someone he had worked with and was asked by this man if Mike (my husband) was back to work yet. Mike said, "No. I keep getting called back and then laid off." Well, this man asked if Mike wouldn't mind being his "Right hand man." Mike responded VERY quickly with a, "YES!" So, after a few days (The man that needed Mike had to clear it with the Union first) He called Mike and asked if he could start that Monday!
That black cloud has finally lifted! With the Union, you never do know exactly what is going to happen, but for now, we are all smiles!! :o)
So, I now feel I can continue with my blog! I have been scrapping and creating cards the past few months, I just didn't really have much to say and quite frankly I didn't think anyone was really viewing my blog! Until I checked my email and noticed some messages asking where I have been! It was nice to know people are reading!
So, now I'm back and with a TUTORIAL on how to create this collage look.

Below are the colors that I used to create my card.
Sahara Sand
Pink Pirouette
Baja Breeze
Certainly Celery
Soft Suede
Regal Rose (Not Shown)
River Rock (Not Shown)

These are the stamps I used from SU!
French Script background stamp
These are the sets I used:
My Friend
Forever Young
Creative Elements

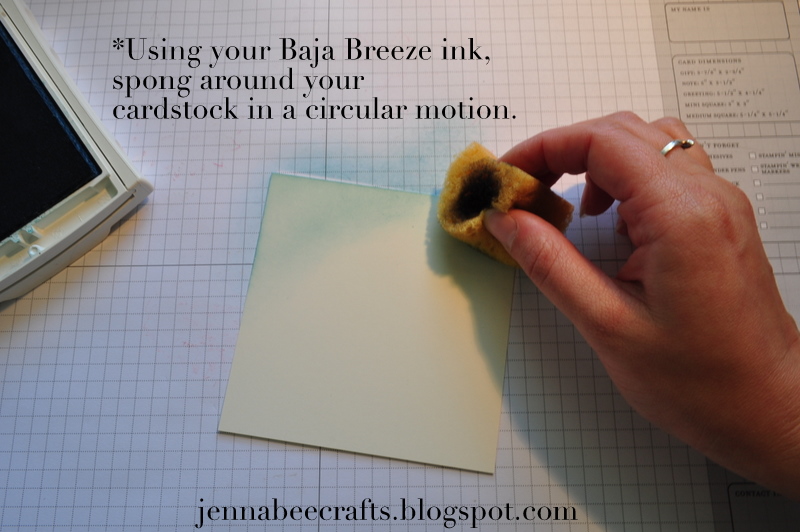
The size of the cardstock I used is 4x4 and I used Very Vanilla Cardstock.

Using my Baja Breeze ink, I sponged (in a circular motion) around my cardstock.

Next I used, Pink Pirouette and in a circular motion I sponged around the inside of the Baja Breeze.

Next, I used the Sahara Sand and again, in a circular motion I sponged inside and all around my cardstock. I find Sahara Sand really blends colors together well without altering the colors.

Now, using my large French Script background stamp, I inked it up with Soft Suede ink and stamped onto my cardstock.

Next I chose the flower from Creative Elements and inked it up in Regal Rose ink and stamped it down a couple times in my cardstock. Be sure to re-ink your image every time you stamp.

Now I used the clock image from Forever Young stamp set and inked it up in River Rock ink. Then I took the flower silhouette from My Friend and stamped it down at the bottom right corner.

At this point, I added a little more Baja Breeze to the edges of my cardstock to darken it a bit. Then, I grabbed another sponge and inked it up with some Certainly Celery and went around the silhouette flowers to add a it of green. Can you see it??
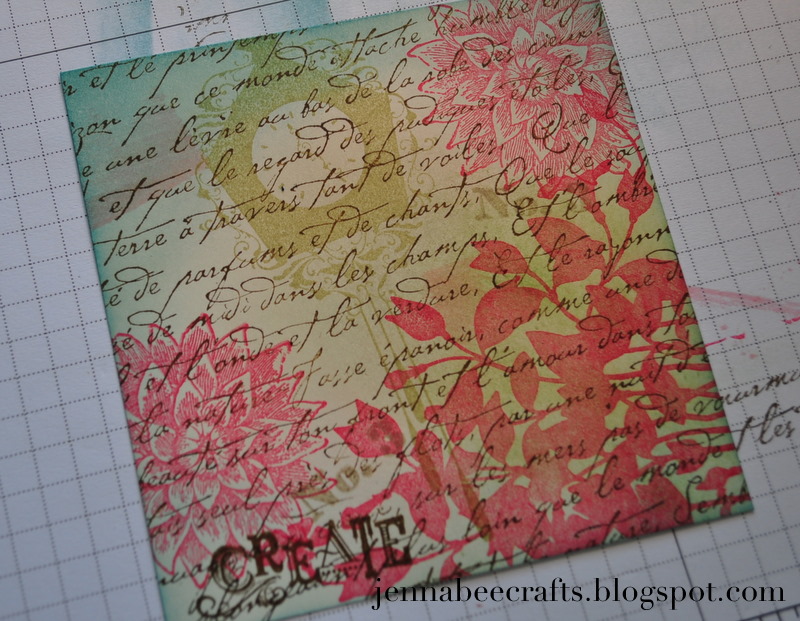
Now, I took some Soft Suede and went around the edges of my card. As you can see I used the direct to paper technique. I just "wacked" the edges of my carstock so it gave and "aged" look.


After I was finished with the Soft Suede, I began to "rough" up the edged of my cardstock. This again helps with the "aged" and vintage look I was going for.

Once your "collage" is finished, you can begin to embellish it if you'd like! I felt like there was so much going on with the collage that adding too much more would just look ridiculous. So, I let it speak for itself and added some wrinkled seam binding, a button, some linen thread and some PEARLS... OF COARSE!! :o)
I really hope you like my "Collage" card and tutorial! I really did enjoy creating this one!
Til next time!
~jenna
BTW: I believe you can click on the photos for a larger view!
Hi Jenna, this is gorgeous. I plan to try it soon. I've been wanting to do this type of card, and the tutorial will help make it a reality for me:0)
ReplyDeleteI don't believe anyone should apologize for not posting on a blog enough. life happens, and you don't need to feel bad for not posting, Heaven knows you put so much of your time and creativity into SCS too, we are all very blessed that you are so dedicated at using God's gift of creativity to you and that you share it with us:0)
Love, Claire
It is nice to see you back again Jenna. I really like your tutorial and agree with Claire, you don't owe us an apology. I am happy things are going better for you and your family. Hang in there. Life happens :)
ReplyDeleteI've missed you, although at least I've been seeing your creations.
ReplyDeleteI know what it's like when things are tough - sometimes it's easier just to stay quiet - you're busy enough coping with life and don't have a lot of energy for an online life too. DH was off earlier this year for what was meant to be 4 weeks (because HR wouldn't let him stay on in a temp capacity even though the work was there) but turned out to be 12. And we don't have kids to care for. I hope it stays all smiles for you for a good long time now.
Hi Jenna,
ReplyDeleteI am so glad that everything is back on the right track for you and your family.
Your card is so beautifully done, thanks for sharing the wonderful tutorial with us!
Hugs,
Joanne
Hi Jenna,
ReplyDeleteThis tutorial was so helpful! I'm feeling inspired now to give it another try. Thanks for posting this and the pm letting me know to come here and take a look!!
Robin
Hi Jenna,
ReplyDeleteThis is beautiful! I just saw it on SCS too...I'll have to try this out myself sometime! I didn't blog for about 1 year up till March, so don't feel bad! Although I didn't have any followers, at least now I have 30. :-).
Life certainly does get in the way sometimes...I have been dealing with an extremely difficult situation the past year and 1/2 personally. If I didn't have wonderful ladies at Bible study and God in my life, I don't think I would have gotten through it. At least now things look a little better.
I've seen a lot of your creations on SCS, your things are so gorgeous! I don't think I've seen anything I don't love!
Thank you for sharing your work. Glad to hear things are better for you!
Blessings!
Kathy
Thanks for the tutorial, Jenna. Such a lovely card and so generous of you to share your talents with us all. Wishing brighter days ahead for you and your family. God bless,
ReplyDeleteHolly
Lovely blog. I enjoyed the music as I read it and viewed the tutorial. Beautiful card. I often create sponged backgrounds, too. Adds so much to projects. I love that you stamped the images in colors. I noticed that most of the challenge posts are stamped in neutrals or one color and black. It's refreshing to see your soft and pretty colors. :) So glad your husband is back at work. Financial stress can be emotionally devastating, which can cause physical stress, as well. BTW, thank you VERY MUCH for sharing your enthusiastic comments on my SCS (gabalot) cards. I appreciate every word. Sending you sunshine. Hugs, Gabby
ReplyDeleteJenna- a 3 layer bg is one of my favorite looks that I have done alot!! Great tutorial on how to!!
ReplyDeleteWow - this is absolutely stunning. I saw this card on Nancy Riley's blog - iStamp in her iPicks for the week - so I had to stop by and say how much I love your card. And thanks so much for the tutorial - I am really inspired to have a go at this style of card. The pearls and seam binding are just the perfect embellishment.
ReplyDeleteHi there Jenna ~ I'm so sorry things have been rough, so glad you and your family are getting a fresh start. I love, love, love this collage card. I must try my hand at it again, thanks so much for the wonderful inspiration :) Sending a huge hug, Emma x
ReplyDeleteJust found your blog from Nancy Riley's iPicks! Your card is so beautiful -- and the tutorial is wonderful! Thanks so much for sharing!
ReplyDeleteThis is absolutely beautiful! It caught my eye on the Stamping at 6213 site. I'm glad your husband is back to work, it must have been just awful for you and your family.
ReplyDeleteJanet L.
Hi Jenna,
ReplyDeleteThanks for this great tutorial. Love your take on the card.
Will be doing asap..Regards Cheryl
This is so beautiful! I love it!! I'm always looking for new ways to add collage or vintage elements to my cards - usually mine don't quite get there. I really appreciate that you showed step by step how you did it.
ReplyDeleteGod Bless
Marilyn
This card is simply stunning!! I wish I had those stamp sets!! Thank you for sharing the step by step process. :)
ReplyDeleteHi again. I was so inspired by your card that I CASEd it this morning. It's my first ever 'vintage' card so it's not great but I really love this sponging & layering technique. It's fun to mix up the stamp sets too. I used Bliss, Pendant Park, Boho Backgrounds & a fleur-de-lis from the Lovely Letters set. I know I won't get a chance to photograph it (I have a toddler and a 16wk old baby) so it won't end up on my blog...but if it did I would credit you as the inspiration! Thanks again for sharing - you make beautiful cards!! :)
ReplyDeleteI LOVE this card!! It's beautiful! Thank you for sharing your steps! I can't wait to try this. (Also, BTW, you have great taste in music! Many of these songs I have on my ipod too.)
ReplyDeletegorgeous. glad to hear about the job situation
ReplyDeleteWOW, WOW, WOW!!!
ReplyDeleteGorgeous Jenna. Love the tutorial & a big thank you for it as I am going to give it ago
ReplyDeleteJenna, I love this. What a beautiful card. I love collage and have always wanted to create one. Thanks so much for the tutorial. (The music that accompanies this tutorial is so lovely.)
ReplyDeleteThis is a beautiful card with the best ever tutorial! I gave this a try and am so pleased with my first attempt that I am actually going to give it to my friend for her birthday card. Thank you so much for your inspiration and help. I will be doing this a lot in the future now that I know how to do it and that I have discovered how fun it is! Thanks again!
ReplyDeleteTeresa
Jenna love your card. Thanks for sharing, be Blessed.
ReplyDeleteI love this card! How did you make the frame around the edge? I want to make this.
ReplyDelete