Monday, July 18, 2011

My DREAM truck....

Hey Everyone!!

 I was asked  to be a "guest designer" over on SplitcoastStampers.com for the color challenge this month! I am still so thrilled that I was asked!

The colors this week are: Pool Party (New SU! In Color), Wild Wasabi and Chocolate Chip.

I am not sure I would have ever thought to put these colors together, however I LOVE the way they look!

This is the card I created for the challenge:


Yes, ANOTHER vintage truck card! lol I DREAM of owning a truck like this someday!! (in this color, too!) You may have already picked up on the fact that I have a love for anything vintage! Well, my dream is to have all rustic vintage style furniture inside and out of my home! :o) A girl can dream... right??

Hope you like my card!!

Off to bed now...

~jenna

Friday, July 15, 2011

My Doily Card....

Hey Everyone!!

 I had the time to create another card today! This card was inspired by a wedding cake called, "Petite Cake." Here's the website where you can find the cake. You'll have to go through the portfolio to find it. For some reason, I can't get a direct link! :/
My card fits perfectly in a 5"x5" card. I wish I knew someone who was getting married! I guess I'll just put it away in my stash of cards and wait till I have someone to give it to!
Hope you like my card!
~jenna 

Sunflower....

Happy Friday!!

I just recently got this Scallop Square die for my BigShot and I absolutely LOVE it!! I have cut quite a few these scallop squares out, but haven't put them to use on any cards yet. So, this morning, after I stamped down this new stamp from SU! conveniently called, "Sunflower," I thought the scallop background would look cute! I started off with my image panel being 4.5x4.5 and all of a sudden it was cut down to 3x3! This card is pretty small measuring 4.25x4.25!

I absolutely LOVE this stamp and I think my card turned out pretty cute! I would say this stamp is a must have for anyone who has a love for Sunflowers. 


Here are the deets on how I made this card:

Using my SU! marker Daffodil Delight, I colored all the petals directly on the stamp. Then, I took my Chocolate Chip marker and started to color the inside of the flower. The, I grabbed my Early Espresso marker and just colored in the center trying to blend the Chocolate Chip and Early Espresso together. Next I Stamped down the Sunflower onto my paper. The cardstock size I started out with was 4.25x4.25 but then I cut it all the way down to 3x3! 

Next I sponged some Crumb Cake all around my image panel. Next I roughed up all the edges of my cardstock and the took some Early Espresso and sponged all around the roughed up edges.

Next I chose some Crumb Cake  cardstock (3 1/8" x 3 1/8") to place under my image panel and then I used some Early Espresso cardstock (3 1/4 x 3 1/4) to place under that! I texturized the Early Espresso to help my image panel POP a bit more! As you can see, I LOVE layers! lol 

I thought it needed ONE more layer... so, I chose some Very Vanilla cardstock (3.5" x 3.5") and sponged all the edges with some Crumb Cake and then a little Early Espresso.  Then roughed up all the edges and added it to my base which is the Scallop Square that I cut out with Early Espresso. 

Next, I used some twine and an Early Espresso button in the center and added a tiny tag (I LOVE the tiny tag punch and stamp set) and then sponged it a bit with some Crumb Cake. 

Hoe you all like my Sunflower card!!
Happy Friday, everyone!!
~jenna

Thursday, July 14, 2011

Collaging some new GOODIES!!

Hey Everyone!!

Well, I just want to begin by saying, I am sorry it has been so long! I have to be honest, the past few months were a little difficult around here. My husband had gotten laid off THREE times since he got back to work in March. He was laid off the whole winter (He's in the Union) and was lucky enough to be called back to work in March. We were SOO happy! Then, shortly after he was laid off AGAIN! Then called back, then laid off another time. It was rough around here. Thank GOD for family and ALL th support they gave! After a lot of praying and a lot of phone calls, my husband received a phone call from someone he had worked with and was asked by this man if Mike (my husband) was back to work yet. Mike said, "No. I keep getting called back and then laid off." Well, this man asked if Mike wouldn't mind being his "Right hand man." Mike responded VERY quickly with a, "YES!" So, after a few days (The man that needed Mike had to clear it with the Union first) He called Mike and asked if he could start that Monday! 

That black cloud has finally lifted! With the Union, you never do know exactly what is going to happen, but for now, we are all smiles!! :o)

So, I now feel I can continue with my blog! I have been scrapping and creating cards the past few months, I just didn't really have much to say and quite frankly I didn't think anyone was really viewing my blog! Until I checked my email and noticed some messages asking where I have been! It was nice to know people are reading!

So, now I'm back and with a TUTORIAL on how to create this collage look.
Below are the colors that I used to create my card.
Sahara Sand
Pink Pirouette
Baja Breeze
Certainly Celery
Soft Suede
Regal Rose (Not Shown)
River Rock (Not Shown)

These are the stamps I used from SU! 
French Script background stamp
These are the sets I used:
My Friend
Forever Young
Creative Elements
The size of the cardstock I used is 4x4 and I used Very Vanilla Cardstock.
 Using my Baja Breeze ink, I sponged (in a circular motion) around my cardstock.

 Next I used, Pink Pirouette and in a circular motion I sponged around the inside of the Baja Breeze.
 Next, I used the Sahara Sand and again, in a circular motion I sponged inside and all around my cardstock. I find Sahara Sand really blends colors together well without altering the colors.

 Now, using my large French Script background stamp, I inked it up with Soft Suede ink and stamped onto my cardstock.

 Next I chose the flower from Creative Elements and inked it up in Regal Rose ink and stamped it down a couple times in my cardstock. Be sure to re-ink your image every time you stamp.
 Now I used the clock image from Forever Young stamp set and inked it up in River Rock ink. Then I took the flower silhouette from My Friend and stamped it down at the bottom right corner.
 At this point, I added a little more Baja Breeze to the edges of my cardstock to darken it a bit. Then, I grabbed another sponge and inked it up with some Certainly Celery and went around the silhouette flowers to add a it of green. Can you see it??
 Now, I took some Soft Suede and went around the edges of my card. As you can see I used the direct to paper technique. I just "wacked" the edges of my carstock so it gave and "aged" look.

 After I was finished with the Soft Suede, I began to "rough" up the edged of my cardstock. This again helps with the "aged" and vintage look I was going for.
Once your "collage" is finished, you can begin to embellish it if you'd like! I felt like there was so much going on with the collage that adding too much more would just look ridiculous. So, I let it speak for itself and added some wrinkled seam binding, a button, some linen thread and some PEARLS... OF COARSE!! :o)


I really hope you like my "Collage" card and tutorial! I really did enjoy creating this one!
Til next time!
~jenna
BTW: I believe you can click on the photos for a larger view!

Tuesday, June 28, 2011

Coming soon....

Hey everyone! I know I have abandoned my blog the past couple of weeks and I am sorry,

but I will be back SOON!

PROMISE!!

Thank you so much for your patience!

See you soon!

~jenna

Wednesday, May 18, 2011

A Vintage MASCULINE card...

I know, I know... this is NOT a tutorial like I promised, however I thought I'd post this "Father's Day" card I made this morning, anyway! I hope you all don't mind!

Can you believe I made a Vintage MASCULINE card!?!? I know... I can't, either!! I have to say I am pretty proud of myself! I have a TRUE love for anything vintage! I love distressing paper and dusting different colors on my paper to make it look aged! Not ALL my cards have that Vintage feel, but honestly, most of them do! lol 
Growing up, I absolutely LOVED going to Antique stores with my mom and little sister Amanda! (yes I STILL call her my little sister and we're only 18moths apart!) I lived in NY growing up. About 20mins. from NYC. We had a bunch of Antique stores where we lived. My mom was always on a mission when we went antiquing. She was on the hunt for, "1964 World's Fair" memorabilia. We would have so much fun looking around the Antique stores with my mom. She'd ask if they had any "World's Fair" memorabilia and most of the time it would spark some conversation. I loved listening to the stories she and the store owner/workers would swap. She'd always light up talking about how amazing and fun it was for her when she was a little girl. Many times Amanda and I would walk around trying to guess what some of the "contraptions" were. We laugh a lot at all the wacky stuff there was. There were a few things I would always want to check out. Like looking at the records. I remember picking up an OLD Woodstock record and you could just tell that whomever owned that record played it A LOT! It was completely warped from the record player needle. Another thing I liked to take a peak at was the old "TIMES" magazines and newspapers. it was fun reading them and looking at the old stories. I think just about EVERY antique store had them. I also loved the colors of the plates and the simple, yet beautiful designs they had. Home decor item were definitely different, too. Lamps looked so neat. My mom also collected those 1950's pink/turquoise dish sets. She had this huge glass case in her kitchen which showcased her neat collection. My mom was even interviewed with all her antiques for a documentary that was being made on the "1964 World's Fair!" Pretty neat stuff, huh? So, like I said earlier... no wonder where I acquired my love of Vintage Flair. Thanks mom for all the AWESOME memories!!
About the card below: 
Again, I am just so surprised I came up with something MASCULINE with a Vintage flair! I used Stampin' Up!'s! set called Countryside. I think this image is just PERFECT for a "Father's Day" card! My husband has a truck and it's black so I thought I'd try to color in this image to match his truck! I used watercolor paper and SU!'s markers with a blender pen for my image. I really enjoyed coloring this truck in! I'm not sure if you all know this about me or not, but I absolutely LOVE Sahara Sand and Very Vanilla. They are my "Go To" colors! The new Newsprint dp from SU! is also one of my faves right now. This card really did come together quite easily. Just thinking of all the old vintage items I used to see in those antique stores really helped me to put this card together! I hope you like it!!


I promise, my tutorial is coming soon....
 
Hope you all have a great day!
~jenna

Monday, May 16, 2011

Since many of you requested....

Hey Everyone!

Last week was a very hectic week for me! I literally had something going on every day!  I haven't quite been myself. I feel super sleepy all the time and not really up for doing anything. My allergies have literally sucked all the energy out of me! When I lived in NY, my allergies consisted of: stuffy nose, sneezing, and post nasal drip. Ya know... all that "good stuff." It lasted a couple of weeks and I'd even have a day or two in between where they just went away! Can I tell you... I'd MUCH prefer THAT over the lack of energy I have had this allergy season! I read that this is a horrible allergy season and people are really being affected! This lack of energy has somewhat brought on my depression again, which is just wonderful I tell 'ya! So far, the Allegra hasn't done anything for me... I'm going to try some Zyrtec, soon! If that doesn't work... I think it'll be time to go back to the doctor for some other Rx...

On my last post, I posted two cards that some of you seemed to want to know the details about. Well, this post is where you will find how to make this pink and white "Newlyweds" card.

Here are the supplies I used to make the card above:

Stampin' Up! stamp set called "On The Grow"
White (I used Shimmery White) Card stock
Pink Pirouette cardstock
The embossing folder I used was "Vintage Wallpaper" by SU!
I used a round 4" doily
To create the circles I used Nestabilities standard circles large
SU!'s Paper piercing pack
Pearls
Ribbon of your choice (I used some super thin silk ribbon)
I also added some pearl corsage pins and added a little rosette
Crystal Effects was used to create the "glass" appearance on the vase
Dimensionals and double sided tape were used to put my card together

The following markers were used:
 -Pink Pirouette
 -Blushing Bride
 -Daffodil Delight
 -Pear Pizzazz
 -Garden Green
 -Sahara Sand
 -Crumb cake
 -Gel Pen
  -Blender pen


Measurements and details of the card:
-The card size is 5"x5"- I then embossed the front of my card using the Vintage wallpaper embossing folder. Next I roughed up the edges!
-The next layer: Pink Pirouette is 4.5"x4.5" I (faux stitched) paper pierced around that piece of card stock. Then i ran it through the Vintage Wallpaper embossing folder THEN I used the gel pen to create the "stitching." If you use the gel pen first and then run your paper through the embossing folder (ef), you may get some gel pen on your ef. Sometimes that can be annoying when you put a darker piece of cardstock in your ef and the gel pen shows up! Now you can rough up the edges!
-Your next layer: Shimmery White (or white) is 4"x 4" This is also paper pierced, then put through your ef. Now you can use your gel pen to create the "stitching." You will also rough up the edges on this layer as well!
-Next I used the doily.

Time to Color!


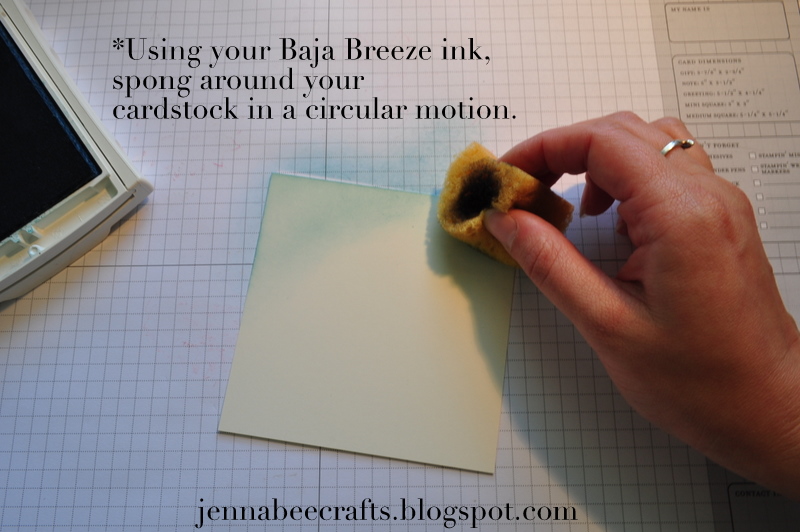
I used Shimmery White cardstock and stamped sown my image in black Staz-On
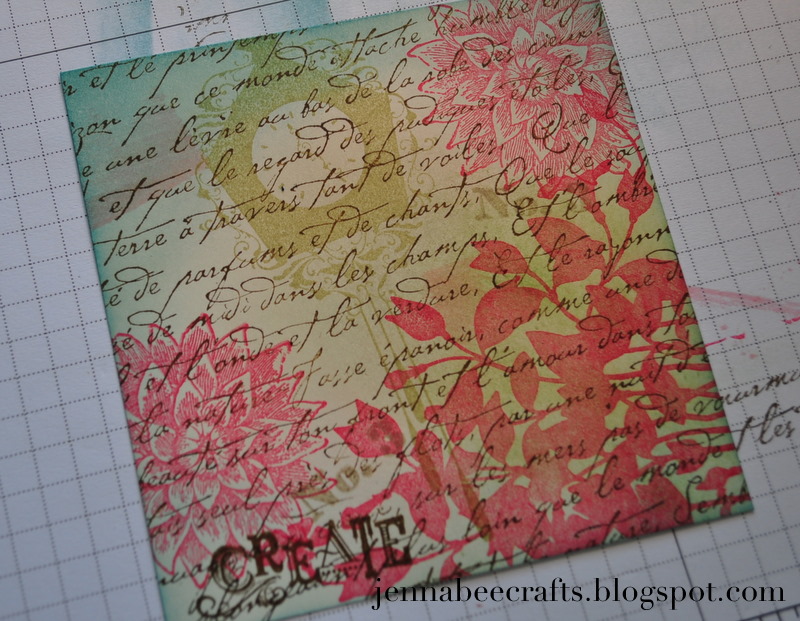
I colored each of my flowers in using Pink Pirouette first. Then to add some dimension to my flowers, I used the darker pink, Blushing Bride. Just adding a bit here and there on each flower leaving the center white. Next I took my Daffodil Delight marker and added a bit in the center.
For the leaves on my image I colored each leaf with Pear Pizzazz. Then to add some dimension on the leaves, I added a bit of Garden Green marker where all the "shadow" markers are on my image! Next, I used Sahara Sand to outline the vase of the flowers. Then, I lined the whole image with some Sahara Sand. Using my Crumb Cake marker, I added a line under the image where the shadow of the vase is and then used my blender pen very lightly to move the color around. If you use too much blender pen on regular cardstock, it will begin to tear!

Once you are finished coloring in your image to your liking. (I tried to give you a loser view of the coloring on my image... hope the above photo helps!) You will now need to choose the proper size to cut out your image. Next, you will need to start layering your image. For each layer behind my image, I used the same Vintage Wallpaper ef and roughed up the edges as well!

After all your layers are competed, you can start putting together your card! I always wait to put my card together until the end. That way, if there is something I want to add, or take away I won't destroy the whole thing! I used some dimensionals and my double sided tape runner to put my card together!
Another thing is: I usually embellish my card after I have put it together! You can add some pearls or bling and use a punch to add your sentiment. You can also add the Crystal Effects to your image and sit your card up to let it dry!

I hope all these are the details that you were looking for! If you re-create this card using this "How To" I would LOVE for you to send me a link so I can see it! If there is something I missed or you have a questions regarding one of the steps, don't hesitate to ask!

FYI:
 My next Blog post will be a TUTORIAL using SU!'s Top note! Let's just say, if you are looking for a sturdy little something to place a small card, some chocolate or whatever in it, this next tutorial will be RIGHT up your alley! Here's a little sneak peak of what it looks like! :o)
 
Some of the supplies you will need for the above project are: SU!'s Top note die, your favorite embossing folder (This should be one with a large design, the ef's with too much detail may become flimsy), Your favorite mini floral set, some of your favorite ribbon, some pearls (Obviously, right??) and a small oval punch. There are more supplies and details that will be given shortly!
See you soon!! Hope you all are interested in another tutorial!!
~jenna