Hey Everyone!!
Well, I just want to begin by saying, I am sorry it has been so long! I have to be honest, the past few months were a little difficult around here. My husband had gotten laid off THREE times since he got back to work in March. He was laid off the whole winter (He's in the Union) and was lucky enough to be called back to work in March. We were SOO happy! Then, shortly after he was laid off AGAIN! Then called back, then laid off another time. It was rough around here. Thank GOD for family and ALL th support they gave! After a lot of praying and a lot of phone calls, my husband received a phone call from someone he had worked with and was asked by this man if Mike (my husband) was back to work yet. Mike said, "No. I keep getting called back and then laid off." Well, this man asked if Mike wouldn't mind being his "Right hand man." Mike responded VERY quickly with a, "YES!" So, after a few days (The man that needed Mike had to clear it with the Union first) He called Mike and asked if he could start that Monday!
That black cloud has finally lifted! With the Union, you never do know exactly what is going to happen, but for now, we are all smiles!! :o)
So, I now feel I can continue with my blog! I have been scrapping and creating cards the past few months, I just didn't really have much to say and quite frankly I didn't think anyone was really viewing my blog! Until I checked my email and noticed some messages asking where I have been! It was nice to know people are reading!
So, now I'm back and with a TUTORIAL on how to create this collage look.
Below are the colors that I used to create my card.
Sahara Sand
Pink Pirouette
Baja Breeze
Certainly Celery
Soft Suede
Regal Rose (Not Shown)
River Rock (Not Shown)
These are the stamps I used from SU!
French Script background stamp
These are the sets I used:
My Friend
Forever Young
Creative Elements
The size of the cardstock I used is 4x4 and I used Very Vanilla Cardstock.
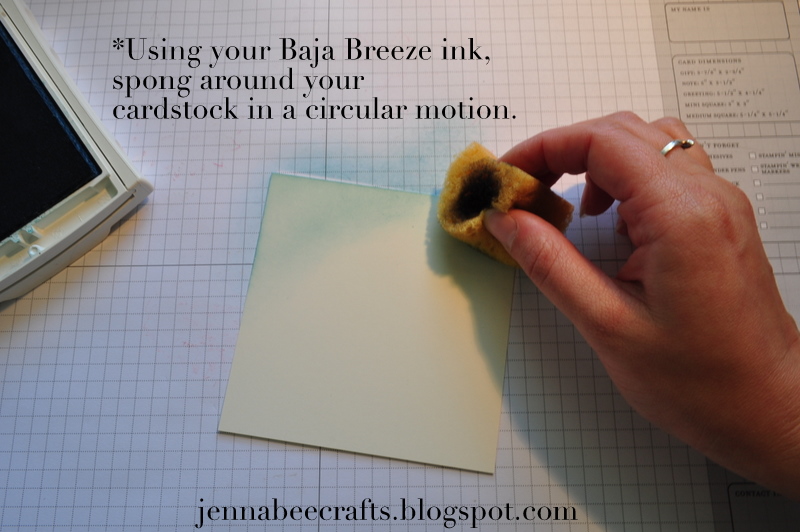
Using my Baja Breeze ink, I sponged (in a circular motion) around my cardstock.
Next I used, Pink Pirouette and in a circular motion I sponged around the inside of the Baja Breeze.
Next, I used the Sahara Sand and again, in a circular motion I sponged inside and all around my cardstock. I find Sahara Sand really blends colors together well without altering the colors.
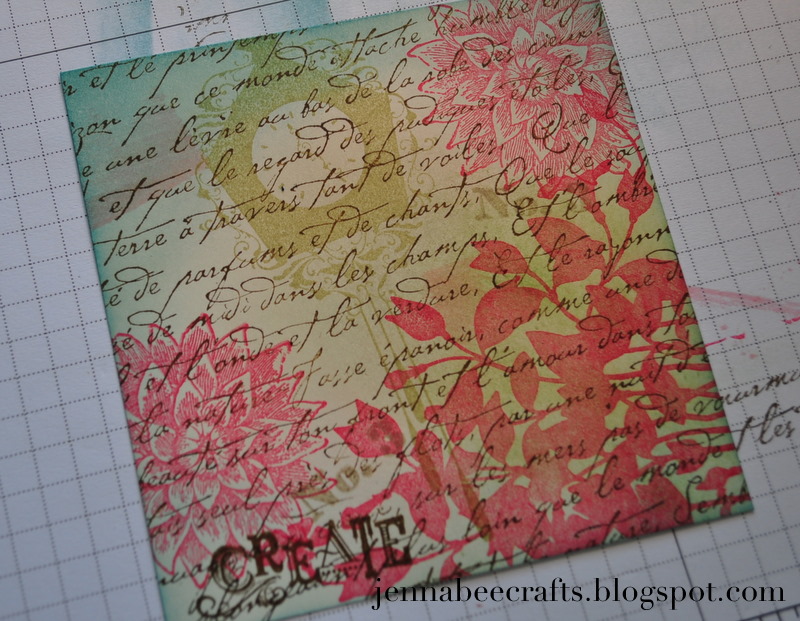
Now, using my large French Script background stamp, I inked it up with Soft Suede ink and stamped onto my cardstock.
Next I chose the flower from Creative Elements and inked it up in Regal Rose ink and stamped it down a couple times in my cardstock. Be sure to re-ink your image every time you stamp.
Now I used the clock image from Forever Young stamp set and inked it up in River Rock ink. Then I took the flower silhouette from My Friend and stamped it down at the bottom right corner.
At this point, I added a little more Baja Breeze to the edges of my cardstock to darken it a bit. Then, I grabbed another sponge and inked it up with some Certainly Celery and went around the silhouette flowers to add a it of green. Can you see it??
Now, I took some Soft Suede and went around the edges of my card. As you can see I used the direct to paper technique. I just "wacked" the edges of my carstock so it gave and "aged" look.
After I was finished with the Soft Suede, I began to "rough" up the edged of my cardstock. This again helps with the "aged" and vintage look I was going for.
Once your "collage" is finished, you can begin to embellish it if you'd like! I felt like there was so much going on with the collage that adding too much more would just look ridiculous. So, I let it speak for itself and added some wrinkled seam binding, a button, some linen thread and some PEARLS... OF COARSE!! :o)
I really hope you like my "Collage" card and tutorial! I really did enjoy creating this one!
Til next time!
~jenna
BTW: I believe you can click on the photos for a larger view!